Installing SQL Server 2005 Management Studio Express on Vista

Posted in Microsoft.NET on August 16, 2008 by vasudevan

I have finished developing a Silverlight web application (Expense Tracker to track day to day expenses). It uses WCF and LINQ on the middle tier and accesses SQL Server 2005 Express. The operating system that I developed on is Vista and unfortunately, SQL Server 2005 Management Studio is not supported on Vista. Management Studio is a very useful tool that can manage any SQL Server database. I wanted this tool to run on Vista. Executing the install (SQLServer2005_SSMSEE.msi or SQLServer2005_SSMSEE_x64.msi) on Vista displays the following error:

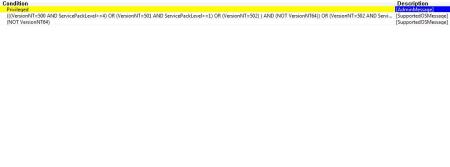
I know for sure that there is a validation in the msi file that checks for the operating system version and prevents install on Vista. Enter ORCA. This is freeware tool that can edit MSI files. (http://support.microsoft.com/kb/255905). Open any of the msi’s in ORCA and search for “Installation of this product”. Keeping pressing F3 until you hit “SupportedOSMessage” property which carries this message. Now, search for this property in the whole MSI and you end up in LaunchCondition Table. On the right hand of the view, there is a Condition that is specified which should look like this:

The installer checks whether the current operating system is 502 or above (The VersionNT version of Vista is 600) and terminates the installtion with a error. The quickest and dirty way to override this is to remove both the Launch conditions and save the MSI file, exit out of ORCA and run the MSI. You should be able to install the Management Studio now on Vista.


Assembly aliases

Posted in C# 2.0 New Features on June 22, 2008 by vasudevan

This is the first in series of articles that I’m going to write on new not so familiar C# 2.0 language enhancements.

This article will talk about the new namespace/class alias feature extremely useful in situations that I have listed below:

1. You have a third party library which happens to have namespaces and the classes that are identical to the ones you have created. When referencing both the assemblies in your client code, you may be confused on how to call the methods in each of the classes separately. You may argue that you cannot modify the namespace/classses in the third party tool but you can do so in your library. But, the point to illustrate here is C# 2.0 has ways to continue using both the libraries untouched with a new alias feature.

2. What if you have two different versions of your assemblies and both have the same namespace/classes and you wanted to use both of them for backward compatibilities or for other things. Enter C# 2.0’s new alias feature.

Here is a working code snippet that you can copy and paste:

Assembly 1:
========


using System;
using System.Collections.Generic;
using System.Text;
namespace Alias
{
    public class AliasClass
    {
        public string Method1()
        {
            return "This is from method1";
        }
    }
}

Assembly 2:
========

using System;
using System.Collections.Generic;
using System.Text;
namespace Alias
{
    public class AliasClass
    {
        public string Method2()
        {
            return "This is from method2";
        }
    }
}

AliasClient
========

using System;
using System.Collections.Generic;
using System.Text;
using Alias;

namespace AliasClient
{
    class Program
    {
        static void Main(string[] args)
        {
            AliasClass al = new AliasClass();
        }
    }
}


Referencing both the dlls and compiling the code, will throw “The type ‘Alias.AliasClass’ exists in both assemblies” error. Also, when you type al. the Intellisense only lists Method1() here. So, you are unable to use both the assemblies.
 

But, C# 2.0 has a very useful feature to eliminate this issue:


extern alias class1;
extern alias class2;

using System;
using System.Collections.Generic;
using System.Text;

namespace AliasClient
{
    class Program
    {
        static void Main(string[] args)
        {
            class1::Alias.AliasClass al1 = new class1::Alias.AliasClass();
            class2::Alias.AliasClass al2 = new class2::Alias.AliasClass();
            Console.WriteLine(al1.Method1());
            Console.WriteLine(al2.Method2());
            Console.ReadLine();
}
}
}


Using the new extern alias keyword, you first declare variables (“class1” and “class2”) for each of the conflicting assemblies.  Since you are within the VS.NET IDE, open the properties window for each of the assemblies and change the Aliases property to “class1” and “class2”. The important way to call the methods in the two different assemblies is to use the “::” syntax instead of the regular “.”syntax.

So, the following code will do the trick:

            class1::Alias.AliasClass al1 = new class1::Alias.AliasClass();
            class2::Alias.AliasClass al2 = new class2::Alias.AliasClass();
            Console.WriteLine(al1.Method1());
            Console.WriteLine(al2.Method2());
            Console.ReadLine();

Pretty neat…uuh…


ClickOnce limitations

Posted in Microsoft.NET on December 17, 2007 by vasudevan

The advantages of ClickOnce are good but it has its own limitations. I had a scenario in my company where I need to uninstall a SmartClient application programatically in a silent way and there is no easy way of doing it. I researched on the problem and even peeped into the API calls inside dfshim.dll by doing this:

dumpbin /exports /out:c:\dfshim.txt c:\windows\system32\dfshim.dll and the output is shown below:
Dump of file c:\windows\system32\dfshim.dll

File Type: DLL

Section contains the following exports for dfshim.dll

00000000 characteristics
4333AC7B time date stamp Fri Sep 23 00:19:23 2005
0.00 version
1 ordinal base
17 number of functions
17 number of names

ordinal hint RVA      name

8    0 00002C45 CleanOnlineAppCache
9    1 00004245 CreateActContext
10    2 00004225 CreateCMSFromXml
11    3 00002A09 DllCanUnloadNow
12    4 000028FD DllGetClassObject
13    5 0000425A GetCurrentActContext
14    6 00002BD0 GetDeploymentDataFromManifest
15    7 000041EB GetUserStateManager
16    8 000041CE GetUserStore
1    9 00002C36 KillService
17    A 00004208 ParseManifest
2    B 00002BAE ShArpMaintain
3    C 00002B8C ShArpMaintainW
4    D 00002B79 ShOpenVerbApplication
5    E 00002B66 ShOpenVerbApplicationW
6    F 00002B53 ShOpenVerbShortcut
7   10 00002B40 ShOpenVerbShortcutW

Summary

2000 .data
2000 .reloc
8000 .rsrc
B000 .text
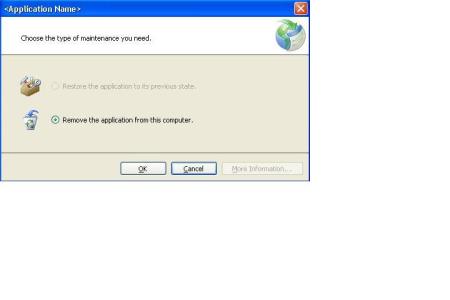
There is no API call from dfshim.dll that can make the ClickOnce “Application Maintenance” dialog to be completely hidden. I really wanted the user to click on the OK button in the dialog to enable us to install a new version using Windows Installer instead of the crappy ClickOnce technology. There is no way to force the user to click on the OK button. So, what do we do?

I thought about it for a while and it occured to me that I can make good use of Win32 API to do some tricks to force the OK button to be clicked for the users. So, the steps outlined are:

1. Using ShellExecuteEx, run this: rundll32.exe dfshim.dll,ShArpMaintain <application_name>.application, Culture=neutral, PublicKeyToken=99a12388f7gh6f76, processorArchitecture=msil will show up this dialog: (I intentionally modified the name of the application and also changed the title name and erased some of the text inside the image).

2. Wait for the dialog to show (I’m not going to show the code for this as this is pretty simple). clickonce-uninstall-dialog-2.jpg

3. Call FindWindow by passing the ClickOnce “Application Maintenance” title name and pass the handle to SetForegroundWindow.

4. Call SetForegroundWindow to force the “Application Maintenance” dialog to get focus and stays visible to the user.

5. Use .NET’s SendKeys class to programatically click on the OK button in the “Application Maintenance” dialog:

SendKeys.Send(“+{TAB}”);   // + indicates SHIFT key which shifts the focus to the OK button as the focus defaults to Cancel button
SendKeys.Send(“{ENTER}”); // ENTER makes the OK button to fire which will do the uninstall for the users.

Had M$ provided us with a way to silently uninstall a ClickOnce app, then it would have been a piece of cake.

TFS (Team Foundation Server) woes

Posted in Microsoft.NET on June 6, 2007 by vasudevan

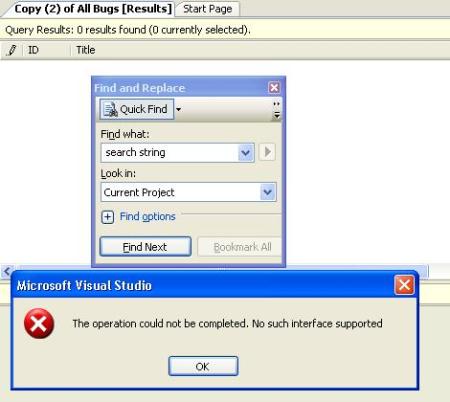
I have been using TFS for the past several months for defect tracking and management and it seems it is working pretty well until I stumbled on this issue. There is no comprehensive support to search across multiple work items. I did Ctrl + F and searched for a string and bang!! – you see the message as shown in the image.

tfs-search-error2.jpg

I thought of writing a addin that accesses TFS SDK to enable that functionality. While searching for TFS SDK documentation, I stumbled upon this nice little addin that does what I had in my mind.

URL: http://blogs.msdn.com/noahc/archive/2007/03/08/search-work-items-team-system-addin.aspx.

I tried this addin personally and it works wonderfully to search for any work item by keyword or by bug ID.

Update: There is another neat addin called “TFS Quick Search” (http://www.codeplex.com/tfsquicksearch) which can do more wonders. Try it for yourself to find out!!!

Private Safari browsing…

Posted in Apple Macintosh on April 8, 2007 by vasudevan

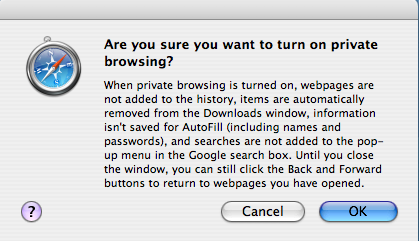
This is my second posting on some of the features available on Mac OS X not directly available on Windows. Ever thought of private browsing on IE 6.x? You can, but there are several settings involved in achieving that. In Safari (Mac OS X), it is straight forward as shown below:

picture-2.png

Can Windows do this?

Posted in Apple Macintosh on April 8, 2007 by vasudevan

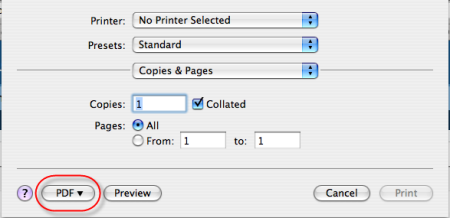
I’m a avid fan of Mac OS X (Tiger) and been using iMac (Intel Core Duo) dual  booting Windows and Mac OS X. This is my first article that compares Mac OS X’s out of the box features not natively available on Windows (2000, Me, XP, 2003, Vista (may be)). How would anybody save a web page as a PDF on Windows. There is no direct way to do it. You would have to get this feature enabled by installing some software that will do this. Enter Mac OS X. Open Up Safari…Navigate to the web page you would like to save as PDF. This picture speaks for you. 

pdf.png

The rest of the steps is child’s play.

Misleading Messages…

Posted in Windows on April 7, 2007 by vasudevan

 windows-error-message1.gif

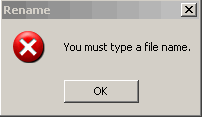
I just discovered this bug when creating a folder in Windows (all flavors after 2000) and it is surprising to see the error message getting displayed. Try creating a folder that begins with a . (example:    .NET Samples). If you examine the message, it is misleading: “You must type a file name”.

I know the real problem. The problem is that Windows thinks that I have typed a filename with no name but just the extension. But, I was infact trying to create a folder that begins with a dot (.).

But, when typing a < or > during folder creation, Windows displays this tooltip tooltip-may-24-2.jpg

and doesn’t even allow you to type a invalid character. Wondering, why didn’t they include this validation when a folder begins with a dot (.).

Btw, I was able to create a folder that begins with a dot (.) like .NET from MS-DOS Command prompt. This is still more confusing !!!

Anybody encountered this?

Displaying all warnings…

Posted in Microsoft.NET on February 9, 2007 by vasudevan

VS.NET 2005 defaults to 200 warnings in the Error List view when a project is compiled. The VS.NET team decided with this number to improve performance of the IDE.  However, it is better to view all warnings at once to enable a developer to prioritize on fixing each of the warning.

To override the 200 warning limit, do this: Navigate to HKEY_LOCAL_MACHINE\SOFTWARE\Microsoft\VisualStudio\8.0\Setup\EDev\CodeAnalysisErrorListViolationLimit and increase the number to something bigger (hex value).

It is a general practice for most of the developers to ignore all warnings and move their app to prod which I feel is not good. It is always better to fix all the warnings and the best approach is to to treat all warnings as errors and fortunately, VS.NET has a setting that can do the same. So, once this setting is enforced in VS.NET, your project will never compile successfully until all warnings are fixed.

Detecting the default browser…

Posted in Microsoft.NET on December 21, 2006 by vasudevan

On Oct 18, I wrote a article on showing hyperlinks from a WinForms 2.0 application. In that article, I also mentioned that I will be writing a article to check the default browser instead of hard coding the .exe file for Internet Explorer. Now this article discusses that technique.


private enum ShowCommands
{
SW_HIDE = 0,
SW_SHOWNORMAL = 1,
SW_NORMAL = 1,
SW_SHOWMINIMIZED = 2,
SW_SHOWMAXIMIZED = 3,
SW_MAXIMIZE = 3,
SW_SHOWNOACTIVATE = 4,
SW_SHOW = 5,
SW_MINIMIZE = 6,
SW_SHOWMINNOACTIVE = 7,
SW_SHOWNA = 8,
SW_RESTORE = 9,
SW_SHOWDEFAULT = 10,
SW_FORCEMINIMIZE = 11,
SW_MAX = 11
}

[DllImport(“shell32.dll”)]
static extern IntPtr ShellExecute(
IntPtr hwnd,
string lpOperation,
string lpFile,
string lpParameters,
string lpDirectory,
ShowCommands nShowCmd);

IntPtr ptr = IntPtr.Zero;
ptr = ShellExecute(IntPtr.Zero, “open”, “http://channel9.msdn.com&#8221;, “”, “”, ShowCommands.SW_NORMAL);

What is happening here is ShellExecute Win32 API call is reading the registry entry at HKEY_CLASSES_ROOT\HTTP\shell\open\command. If you would like to delve under the hood on what is happening in the registry try Regmon. We can make this code more robust by checking whether the entry at that registry location is empty and ask the user to set the default browser in the registry which is pretty easy to do.

The power of IHttpModule…

Posted in Microsoft.NET on December 13, 2006 by vasudevan

I have been reading Marco Bellinaso’s ASP.NET 2.0 Website Programming Problem – Design – Solution. To begin with, the topic that I was interested in was the selectable theme technique explained in Chapter 2 (pages 38 – 41). I thought about his approach and I should admit that the idea was very good, but I was still not convinced and decided to code it using a more efficient approach using IHttpModule. IHttpModule is powerful and efficient enough and this is how I achieved the same functionality:

1. In my approach, there is no need for the ThemeSelector user control. I added the DropDownlist control in the Master page itself. Everybody knows that there is no Page_PreInit() event for Master pages. But, to set a user selectable theme at runtime, Page_PreInit() is the only event that is pluggable for theme selection.
2. On the Page_Load of the master page, code as shown in page 38.
3. On page 39 of his book, there is a bug in the GetThemes() method that returns themes string array. The variable themes is unreachable. So, modify your code to fix that.
4. Create a new regular folder under App_Code by name Modules.
5. Create a new class and name it ThemeModule.cs and copy the following code by overwriting all of the code in your class:


using System;
using System.Data;
using System.Configuration;
using System.Web;
using System.Web.Security;
using System.Web.UI;
using System.Web.UI.WebControls;
using System.Web.UI.WebControls.WebParts;
using System.Web.UI.HtmlControls;
using System.Web.Configuration;

public class ThemeModule : IHttpModule
{
public void Init(HttpApplication application)
{
application.PreRequestHandlerExecute +=new EventHandler(application_PreRequestHandlerExecute);
}

public void Dispose()
{
}

private void application_PreRequestHandlerExecute(object sender, EventArgs e)
{
Page page = HttpContext.Current.CurrentHandler as Page;
if (page != null)
{
page.EnableTheming = true;
page.PreInit +=new EventHandler(page_PreInit);
}
}
public void page_PreInit(object sender, EventArgs e)
{
Page page = (Page)sender;
if (page != null)
{
if (HttpContext.Current.Request.Form["__EVENTTARGET"] == "ctl00$ddlThemes")
{
page.Theme = (string)HttpContext.Current.Request.Form["ctl00$ddlThemes"];
HttpContext.Current.Session["CurrentTheme"] = page.Theme;
}
else
{
if (HttpContext.Current.Session["CurrentTheme"] != null)
{
page.Theme = (string)HttpContext.Current.Session["CurrentTheme"];
}
else
{
PagesSection pagesSection = (PagesSection)ConfigurationManager.GetSection("system.web/pages");
page.Theme = pagesSection.Theme;
HttpContext.Current.Session["CurrentTheme"] = page.Theme;
}
}
}
}
}

All the code does is to check whether the page is requested for the first time. If it is, it reads web.config for the pages section and gets the theme entry and stores the value in a session variable. If the same user requests the same page or some other page, the theme will be loaded from the session. Lastly, if the same user selects a different theme from the dropdownlist, the code checks for postback information by reading the __EVENTTARGET and reading the value of the control’s unique id (ctl00$ddlThemes) and rewrites the session variable.

This code is definitely more efficient than coding a base page that derives from the System.Web.UI.Page and having to change it for every new page you create. Also, this approach is completely transparent and there is nothing that the other developer should do to use this.

Btw, don’t forget to configure your web.config like this:

<httpModules><add name =ThemeModule type=ThemeModule/></

httpModules><pages theme=TemplateMonster masterPageFile=~/Template.master />